
Topology editor
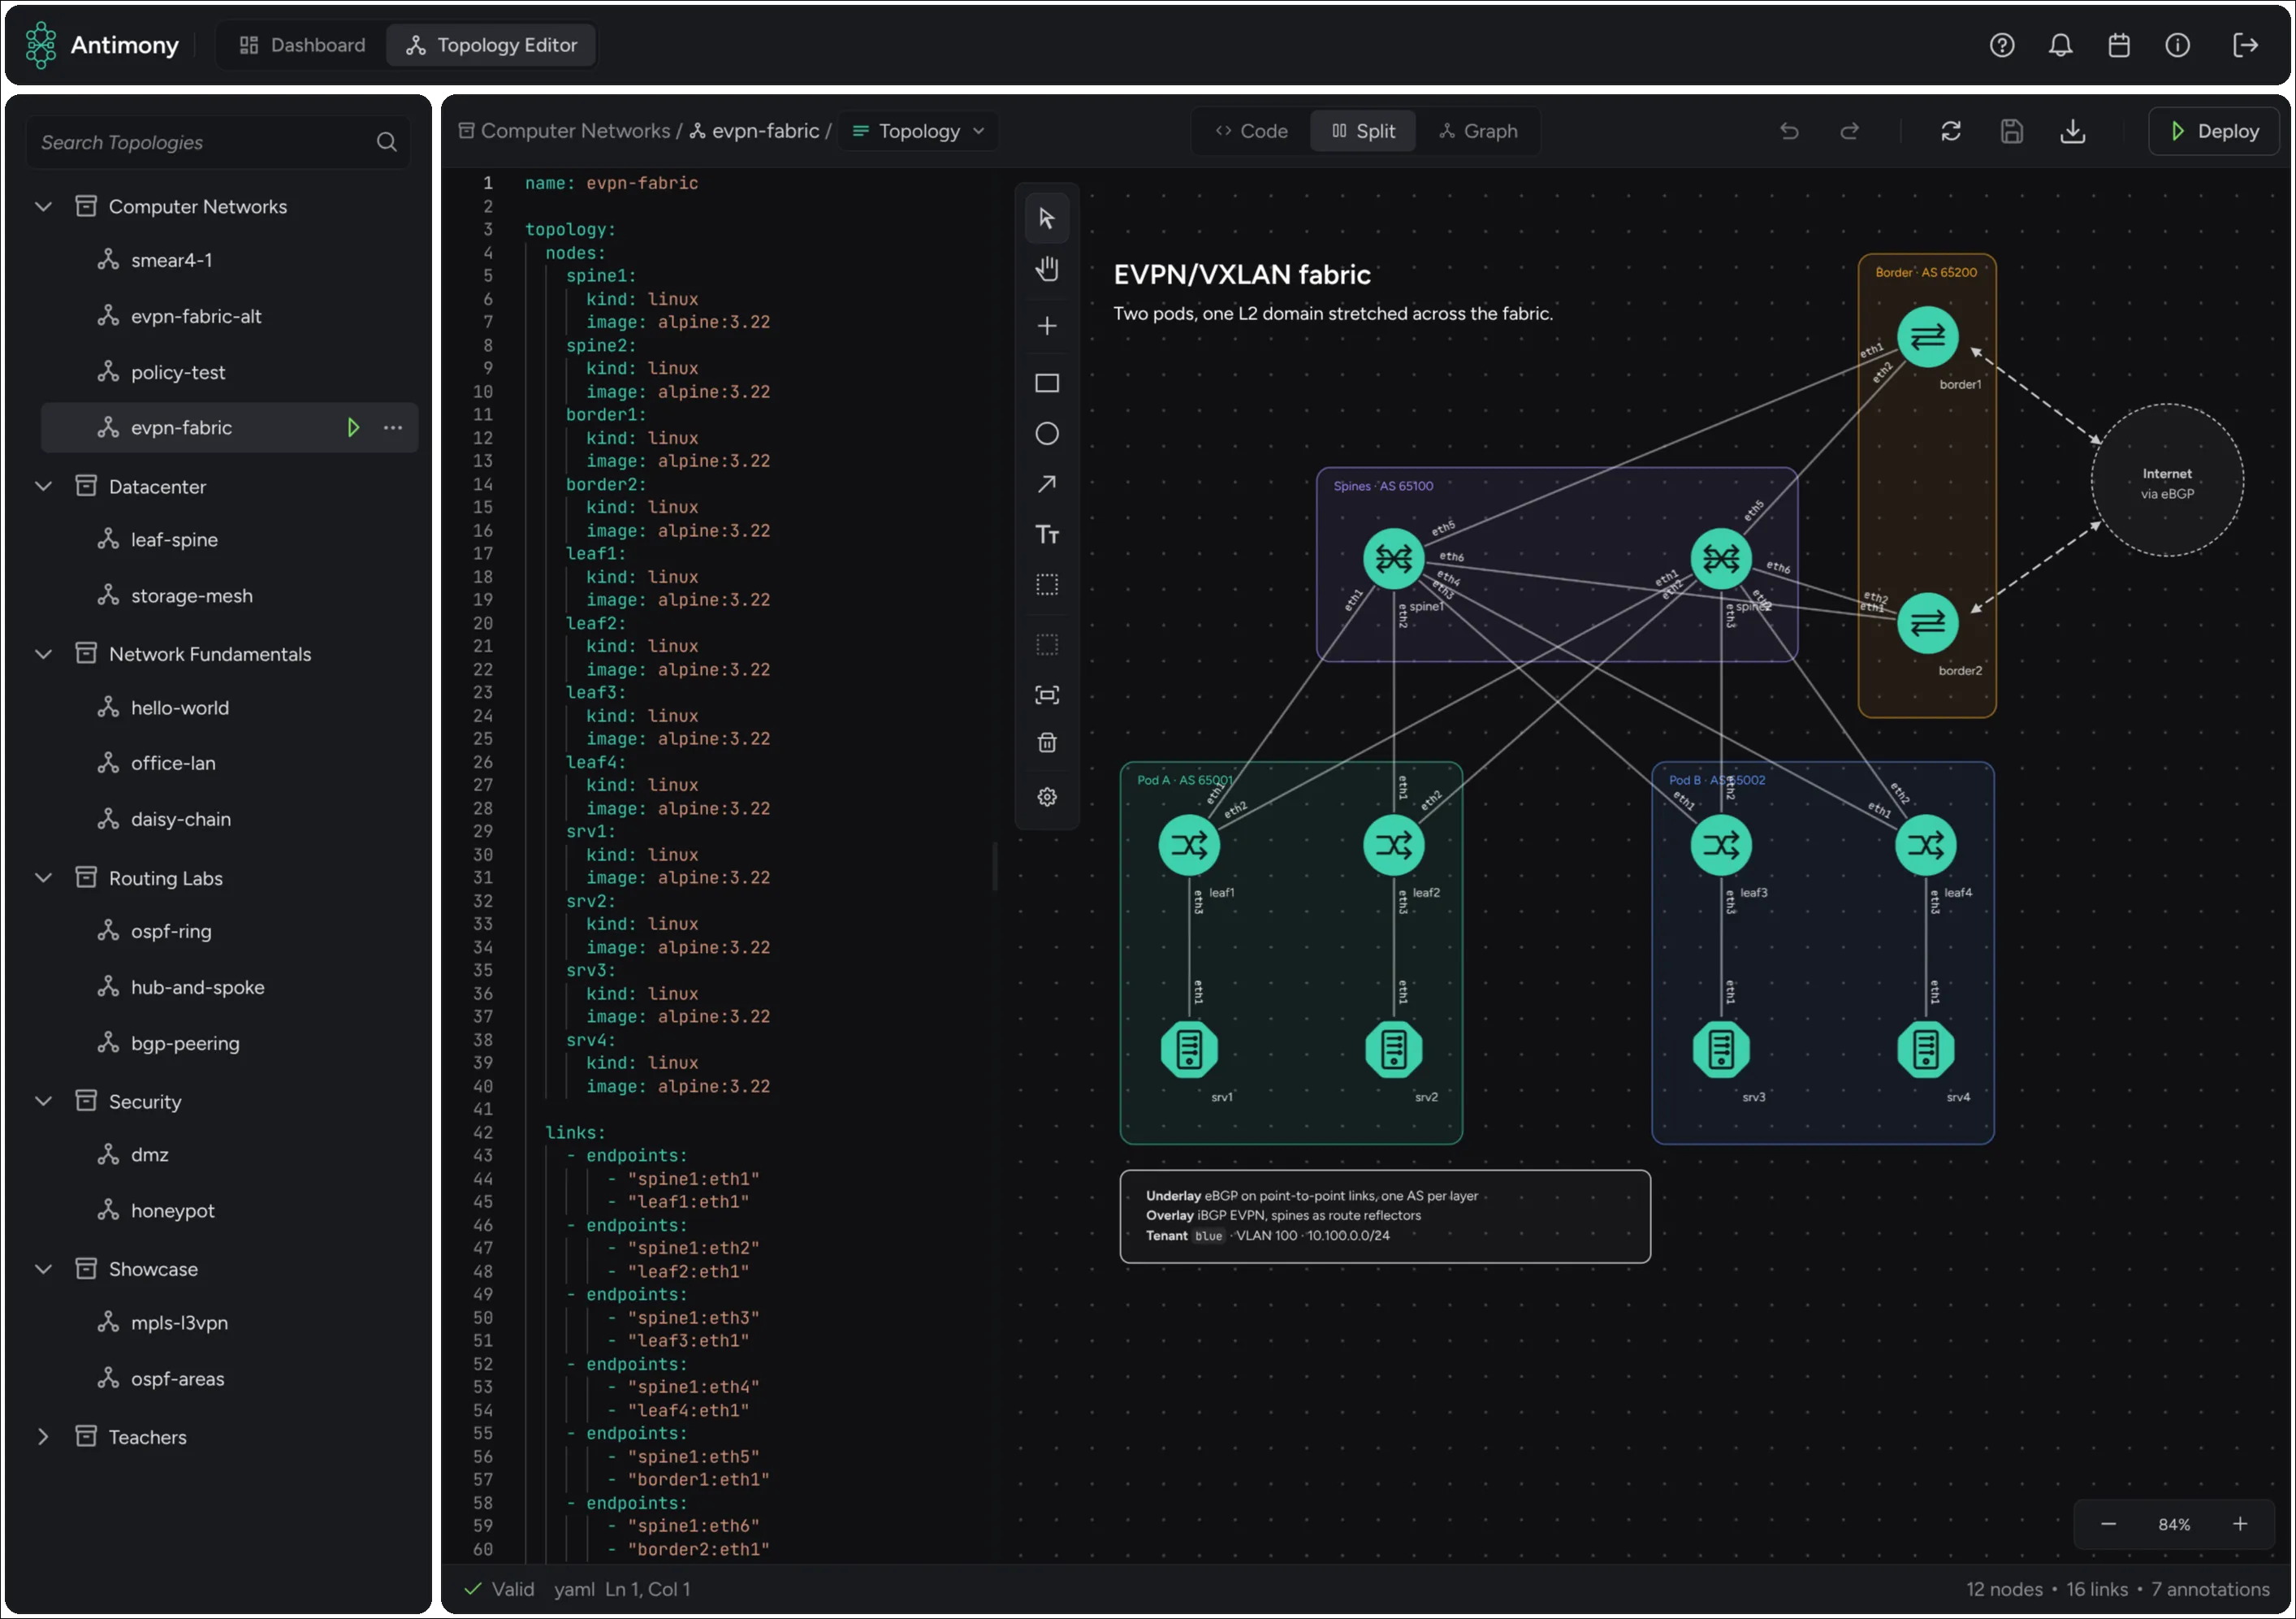
The topology editor is where you create and change containerlab topologies. It shows the same topology two ways at once: as YAML and as a graph. A change in one is reflected in the other.
Collections
Section titled “Collections”Topologies are organised in collections. A collection usually belongs to a class, a course or a team, and it decides who can see and use its topologies (see permissions).
Administrators manage collections:
- New collection: right-click an empty area of the explorer.
- Edit / Delete: open the collection’s … menu or right-click it.
Each collection has two switches:
- Anyone can deploy: everyone with access can start labs from this collection’s topologies.
- Anyone can edit: everyone with access can add topologies here, and change and delete the ones they created.
Collection names must be unique, at most 64 characters long, start with a letter or digit and contain only letters, digits, spaces, ., _ and -.
As long as there is no topology yet, the editor guides you through creating a collection and a first topology.
The explorer
Section titled “The explorer”The left panel shows collections, their topologies and each topology’s bind files as a tree. Type in Search topologies to filter it.
| Item | Buttons and menu |
|---|---|
| Collection | + adds a topology. The menu has New topology, and for administrators Edit and Delete. Both are only shown if you may add topologies to the collection. |
| Topology | ▶ opens the deploy dialog for it. The menu has Deploy, and for its creator and administrators New file, Upload files, Edit, Duplicate, Download YAML and Delete. |
| File or directory | The menu has Edit and Delete. |
Right-clicking an item opens the same menu.
Drag and drop a topology onto another collection to move it. Drag a bind file onto a topology or a directory to move it there.
Creating a topology
Section titled “Creating a topology”Choose New topology on a collection. Give it a Name and optionally a Sync URL (see Git sync). The new topology starts empty:
name: my-topologytopology: nodes: {}The editor
Section titled “The editor”You can edit a topology if you’re an administrator, or if you created it and its collection has Anyone can edit turned on. Other topologies open read-only.
The toolbar shows the topology’s collection and name. An asterisk marks unsaved changes.
| Control | What it does |
|---|---|
| Undo / Redo | Step through your changes. Also Ctrl+Z, and Ctrl+Y or Ctrl+Shift+Z. |
| Code / Split / Graph | Show the YAML, both, or only the graph. Your choice is remembered. |
| Sync options | Set the URL to sync the topology from. |
| Save | Save the topology. Also Ctrl+S. Disabled while the topology is invalid. A red dot means there are unsaved changes. |
| Download | Download the open file: the YAML as <collection>_<topology>.yaml, or the annotations as <collection>_<topology>.annotations.json. |
| Deploy | Open the deploy dialog for this topology. Only shown if you may deploy from its collection. |
If you try to leave with unsaved changes, Antimony asks whether to Discard changes or Keep editing.
Tour (the question mark in the top bar) takes you through the editor. It starts by itself the first time you open a topology.
The YAML editor validates the topology against the containerlab JSON schema while you type, with completion and hover help for every field. The status bar at the bottom shows Valid, Pending or Error; hover over it to see the problem. It also shows the cursor position and the number of nodes and links.
Paths under binds: are links. Click one to open that bind file, or to create it if it doesn’t exist yet.
The graph shows nodes with their icons and the links between them, labelled with interface names. Drag nodes to arrange them; their positions are saved in the topology.
The toolbar on the left of the graph:
| Button | What it does |
|---|---|
| Select (V) | Select, move and resize nodes, groups, shapes and text. Shift-click adds to the selection. |
| Hand (H) | Pan the graph by dragging. |
| Add node | Opens the node dialog to add a node. |
| Rectangle (R), Ellipse (O), Line (L), Text (T) | Draw shapes, lines and text on the canvas. Text is written in Markdown and can contain links and images. |
| Group (G) | Draw a named group box. Nodes and shapes whose center it covers are put in the group. |
| Group selection (Ctrl+G) | Puts the selected elements in a new group. |
| Fit graph | Zooms to show the whole topology. |
| Clear graph | Removes all nodes. Can be undone. |
Topologies you can’t edit only show Select, Hand and Fit graph. On macOS, use Cmd wherever these docs say Ctrl.
While you drag, elements snap to the grid and to the edges and centers of other elements. Hold Alt to turn snapping off. Dropping elements onto a group adds them to it, and the group grows to fit them. Hold Ctrl while dropping to keep them out of groups, or to move them out of their group.
Hovering over a group, shape or text shows arrows on its sides. Drag from an arrow to draw a line that is attached to it. The ends of attached lines follow the element when it moves or is resized.
Click an element to select it. The bar above the selection has its style options and Delete. Double-click a node’s icon to open the node dialog, or its name to rename it. Double-click a link to rename the interface at the nearer end, and a group’s name to rename the group. Right-click nodes, links, groups, shapes and the background for more options.
To connect two nodes, right-click the first one, choose Connect and click the second one. Clicking the first node again connects it to itself. Antimony uses the next free interface on both ends. Press Esc or click anywhere else to cancel.
| Shortcut | What it does |
|---|---|
| Ctrl+C, Ctrl+X, Ctrl+V | Copy, cut and paste the selection |
| Ctrl+D | Duplicate the selection |
| Ctrl+A | Select everything |
| Delete or Backspace | Delete the selection |
| Arrow keys | Move the selection, by a grid step with Shift |
| Ctrl+Shift+G | Ungroup |
| Ctrl+] / Ctrl+[ | Bring forward / backward, to the front or back with Shift. Ctrl+↑ and Ctrl+↓ do the same. |
| F2 | Rename the selected node or group |
| Enter | Edit the selected text |
| Space (hold) | Pan with the hand tool |
| Esc | Clear the selection |
The node dialog
Section titled “The node dialog”The node dialog edits everything about a node:
- the icon (click it to choose one), Name and Kind
- Node properties: every containerlab node property, with search and validation from the schema
- Connections: the node’s links and the interfaces they use
- environment variables, certificates, health checks, DNS settings, labels and more
How the graph is stored
Section titled “How the graph is stored”The topology file only describes the lab. Everything about how it looks in the graph lives in a separate annotations file next to it, <topology>.clab.yml.annotations.json. It uses containerlab’s annotations format, the same one the containerlab VS Code extension and TopoViewer read, so the layout carries over to those tools and the topology stays a plain containerlab file. The server validates the annotations against containerlab’s annotations schema when you save.
Use the Topology / Annotations file switch in the editor to view and edit the annotations as JSON. Antimony writes them whenever you change the layout, such as moving nodes, changing groups or drawing shapes and text.
| Section | Contents |
|---|---|
nodeAnnotations |
One entry per node, matched by id (the node name): its position, icon and the groupId of the group it is in. Nodes placed on a map use geoCoordinates instead of position. |
groupStyleAnnotations |
The group boxes: id, name, level, the position of the top left corner, width, height and optional styling such as colors and borders. A group with a parentId is drawn inside another group. |
freeTextAnnotations, freeShapeAnnotations |
Text, rectangles, circles and lines drawn on the canvas. |
edgeAnnotations, viewerSettings, … |
Other settings from the format. Antimony keeps them when it saves, even those it doesn’t use. |
{ "nodeAnnotations": [ { "id": "leaf1", "position": { "x": 320.5, "y": 180 }, "icon": "switch", "groupId": "fabric" } ], "groupStyleAnnotations": [ { "id": "fabric", "name": "fabric", "level": "1", "position": { "x": 240, "y": 110 }, "width": 320, "height": 160 } ]}Available icons: router, switch, spine, dcgw, server, client, controller, pon and rgw. pe is an alias for router and leaf for switch. Nodes without an icon, or with an unknown one, are shown as client.
Nodes without a position, e.g. in a topology that was pasted, synced or only edited as text, are placed automatically. If no node has a position, the whole graph is laid out by its links. Otherwise, the other nodes keep their positions and the new ones are placed next to the nodes they are linked to. The same topology is always placed the same way, and the positions are only saved once you change the layout.
Layout in labels (older topologies)
Section titled “Layout in labels (older topologies)”Antimony used to store the layout in containerlab labels on each node: graph-posX, graph-posY, graph-icon, graph-group, graph-level, graph-geoCoordinateLat and graph-geoCoordinateLng. These labels are deprecated in all containerlab tools. Antimony still reads them for nodes without an annotation, so older topologies keep their layout, but never writes them. As soon as you change the layout, the labels are removed from the topology and converted into annotations, with a group box created around the nodes of each former group.
Bind files
Section titled “Bind files”Bind files are files that containerlab mounts into nodes, such as startup configurations. They belong to a topology and appear under it in the explorer.
- New file: create a file by its path, for example
configs/r1.conf. Directories are created as needed. - Upload files: upload an archive (
.zip,.tar,.tar.gz,.tgz,.7z,.rar,.bz2). Antimony unpacks it in your browser and lets you pick which files to add. Existing files with the same path are marked and overwritten. A top-level folder named like the topology is removed. - Click a file to edit it in the code editor, and use Download in the toolbar to download it.
- Edit renames or moves a file or directory. Deleting a file asks you to type its path to confirm.
Reference bind files in the topology with paths relative to the topology:
topology: nodes: r1: kind: linux binds: - configs/r1.conf:/etc/frr/frr.confBind file paths must stay inside the topology. Absolute paths and .. are rejected. The topology policy also reports any file the topology refers to that isn’t one of its bind files.
Some names are reserved because Antimony, containerlab or netlab create files with them in the topology’s directory. A bind file can’t be created if the first part of its path matches one of them, ignoring case. Otherwise it could overwrite the topology or the lab’s certificate authority at deploy time.
| Reserved names | Used for |
|---|---|
topology.clab.yaml, topology.yml and their .annotations.json files |
The topology and its graph layout |
clab-* |
containerlab’s lab directory, with the lab’s state and certificate authority |
clab_templates, topology.clab_vars.* |
containerlab templating |
netlab.snapshot.pickle, netlab.snapshot.yml, netlab.lock, hosts.yml, ansible.cfg, group_vars, host_vars, node_files, clab_files, config |
Files netlab generates |
Sync from a URL
Section titled “Sync from a URL”A topology can be kept in sync with a file on the web, for example a raw file in a Git repository.
- Open Sync options in the toolbar, enter the Sync URL and click Save.
- Click Fetch to load the file into the editor.
- Review the changes and Save the topology.